This post may contain affiliate links. See our affiliate disclaimer here.
One of the biggest benefits of RV camping is being able to explore nature while still enjoying the luxury of household amenities, such as heat and air conditioning. However, to keep RV air conditioners working effectively, annual RV air conditioner maintenance is required.
Fortunately, cleaning RV air conditioners is a pretty simple process that most RV owners can complete themselves. Follow the below steps to safely and properly clean your rooftop RV air conditioner.
RV AC maintenance is a fairly straightforward process. However, cleaning RV air conditioners does require climbing onto your RV’s roof. If you are not comfortable on the roof, ask your repair shop to clean and service your AC.
Never assume RV service centers will complete maintenance as part of your annual inspection, always request the specific service.
For more step-by-step RV maintenance guides, check out our eBook: The Owner’s Guide to RV Maintenance.
Tools Required
- Coil Cleaner
- Coil Comb
- Compressed Air
- SAE 20-weight Oil (for units with a fan motor oil cap)
Step 1: Turn Power Off
The first step in cleaning your RV air conditioners is to turn the power off. To ensure the air conditioner fan cannot turn on during service, disconnect your RV from shore power or turn off the breakers for your air conditioning unit(s).
Step 2: Clean Filters
The next step in the process of cleaning RV air conditioners is cleaning or replacing the air filters. Air filters must be cleaned at least annually.
Clogged air filters prevent air from properly flowing, making your cooling system ineffective. We recommend checking the filters every three months when you are regularly using your RV’s air conditioning.
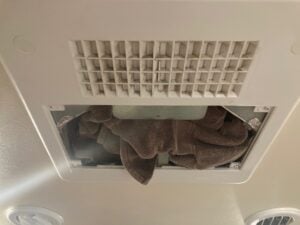
From the inside of your RV, remove the cover over the air conditioner intake filter and remove the filter. Start the cleaning process by vacuuming the air filter using a low suction setting.
If the vacuum does not remove most of the debris from the filter, soak the air filter in a mixture of warm water and mild detergent. After soaking for at least 15 minutes, remove the air filter and use a gentle brush to scrap away the debris.
If the filter is torn or will not clean up with water and detergent, buy a new one. Leave the clean air filter out while finishing your RV AC maintenance. Stuff a towel in the air filter compartment to prevent debris from flying all over your RV during the remaining steps.
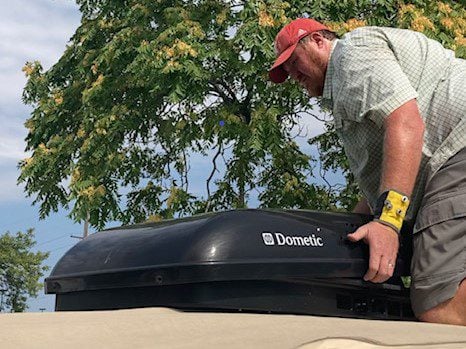
Step 3: Access the Air Conditioner
Head up to the roof of your RV. We carry a telescoping ladder on our travels to provide stable roof access. Have another person on the ground who can hand up the tools and cleaner.
Remove the screws holding down the air conditioner shroud and remove it. Set the screws and shroud aside while you work.

Step 4: Visually Inspect the Unit
Look the unit over for any large debris or insect nests. Mud daubers (wasps) commonly build nest in RV appliances and it is important to clean them out to prevent damage.
Mud dauber nests are clay-like cylinders with a hole on top. Look for and completely remove any nests in your unit.

Step 5: Clean Condenser and Evaporator Coils
Using a specialty coil comb, comb the coils to remove any large debris. Also, inspect the unit for any bent coils and use the comb to straighten them back out.
Next, blow the coils with compressed air to remove any remaining clogs or debris. Finally, spray coil cleaner on the coils.
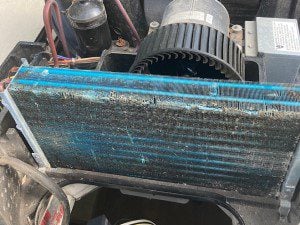
Note: We recommend climbing on the roof, so the entire AC unit can be properly inspected and cleaned.
However, if you are not comfortable accessing the roof, the coils can also be cleaned from below with a vacuum. Using a long vacuum cleaner attachment, simply vacuum the coils from below using a low suction setting.
Step 6: Oil Fan Motor
If your fan motor has a small oil cap on top, you need to add oil every year. Remove the plastic plug from the cup and place 3 to 4 drops of SAE 20-weight oil in the cup.
Step 7: Replace AC Shroud
Allow the coils to dry completely, then screw the shroud back down over the unit. Inside the RV, remove the towel and wipe out any debris left inside the unit. Replace the air filter, and your RV AC maintenance is complete.

Cleaning RV air conditioners is just one part of your RV’s necessary annual maintenance. See our guides to cleaning your RV water heater and sanitizing fresh water tanks to ensure your RV is in tip top shape.
Annual cleaning is just one way to maximize the effectiveness of your RV air conditioner. See our guide on keeping your RV cool in hot weather for more tips on improving AC performance.
When was the last time your cleaned your RV AC? Share your stories and tips with us in the comments section below.

Christina Pate is a seasoned full-time RVer who, along with her husband Justin, has journeyed across the US, Canada, and Mexico. Drawing from her extensive travels, RV repairs and RV renovations, she founded Travels with Ted to guide and inspire fellow RV enthusiasts. Christina is also the co-author of The Owner’s Guide to RV Maintenance and the creator of My RV Log Book.
We have had to clean our coils when the dogwood where we were parked was bad. It looked like a thick layer dog hair covering them. Something you wouldn’t think to check and so glad we did.