This post may contain affiliate links. See our affiliate disclaimer here.
RV slide outs provide additional living space. However, the slide out trim in many RVs is outdated or just plain ugly. By replacing the original trim, you can enhance the appearance and functionality of your RV. Keep reading to learn how to remove, replace and remodel RV slide out trim.
Contents
What is RV Slide Out Trim?

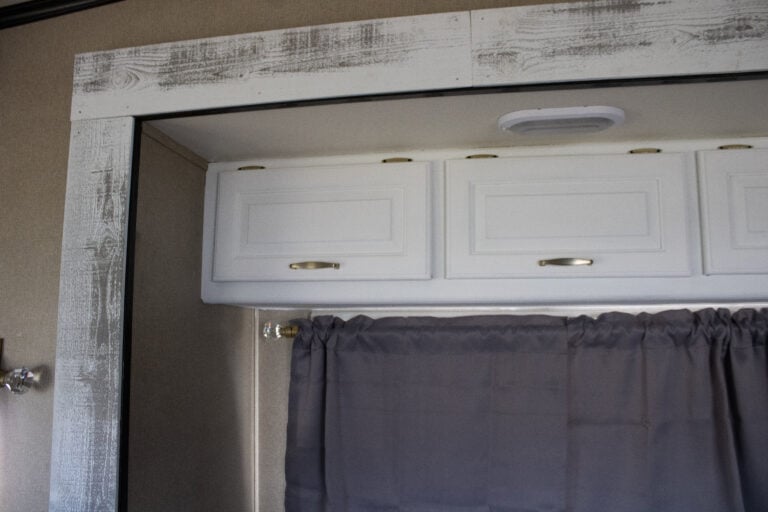
Before we dive into the removal and remodeling process, let’s take a moment to understand what RV slide out trim is. Slide out trim (also referred to as fascia) refers to the decorative and protective molding or edging that surrounds the slide out room. It covers the gap between the slide out and the main structure of the RV, providing a finished look.
Tools and Materials Needed
Before starting the removal and remodeling process, gather the following tools and materials:
- Safety goggles
- Gloves
- Pry bar
- Utility knife or Circular aaw
- Adhesive remover (if original trim is glued down)
- Sandpaper
- Caulking gun
- Trim adhesive or Nails
- New slide out trim
Make sure you have all the necessary items on hand before proceeding with the project.
Step 1: Measure your RV Slide Out Trim
To begin, you need to measure the original RV slide out trim, so you can purchase new trim in the proper size. Measure the length, height and width of each section and write the measurements down.
As with any DIY remodel project, always take the measurements twice to ensure accuracy. After confirming your new measurements, you can purchase new trim.
If you are looking for style inspiration, jump to the section on selecting new RV slide out trim.
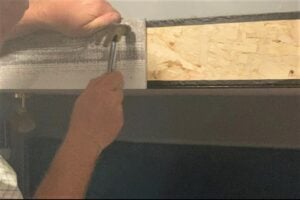
Step 2: Removing the Old Trim

Now, it is time to remove the old trim:
- Wear safety goggles and gloves: Protect yourself by wearing safety goggles and gloves to prevent any injuries while removing the trim.
- Use a pry bar: Gently pry off the old trim using a pry bar or a screwdriver. Start at one end and work your way to the other, gradually releasing the trim from its position. Be cautious not to damage the slide out or the RV structure.
- Remove any adhesive residue: Once the trim is removed, there might be adhesive residue left on the surface (some RV manufacturers glue trim, other use staples) . Use an adhesive remover and a cloth to clean and remove any sticky residue. If there are any staples poking out, also remove those before proceeding.
Step 3: Cleaning and Preparing the Trim Area
With the old trim removed, it’s time to clean and prepare the trim area:
- Inspect the surface: Check the slide out surface for any signs of damage, rot, or water intrusion. If necessary, repair or replace any damaged sections before proceeding.
- Sand the surface: Use sandpaper to smooth out the slide out surface. This will ensure proper adhesion of the new trim and create a clean and even surface.
Step 4: Installing the New Trim
Now comes the exciting part—installing the new trim:
- Cut the trim: Cute your trim to match the measurements taken in step one. Depending on the material you selected, a utility knife or a circular saw can be used to make precise cuts.
- Apply adhesive: Use a caulk gun to apply a generous amount of trim adhesive along the backside of the new trim. Alternatively, if you are using a thicker trim material, such as wood planks, you can use short nails to secure the trim.
- Attach the trim: Carefully press the new trim onto the slide out, aligning it with the edges. Make sure it adheres firmly and is evenly positioned along the entire length.
Step 5: Finishing Touches
To complete the remodeling process, follow these final steps:
- Wipe off excess adhesive: Remove any excess adhesive that might have squeezed out during installation, using a cloth or a scraper.
- Allow time to dry: Give the adhesive enough time to dry as per the manufacturer’s instructions. This ensures a secure and long-lasting bond. Do not travel or move the RV until the adhesive is dry.
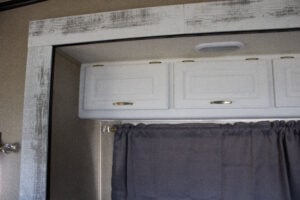
- Inspect the final result: Once the adhesive is fully dry, inspect the newly installed trim for any imperfections. Make any necessary adjustments or touch-ups for a seamless finish..
Selecting New RV Slide Out Trim for your Remodel
Slide Out Trim Options
There are a few options for new slide out trim in your RV. Select pre-finished options or create a custom DIY look.
Pre-Finished Wood Planks
When we updated our RV slide outs’ interior trim, we decided to purchase wood planks that were already painted and ready to hang. We found white, wood wall planks at Lowe’s that were the perfect width for our slide outs.
DIY Wood Planks
If you cannot find a pre-finished option that fits your design needs, make your own. Simply purchase thin plywood planks that match your measurements. Then, stain or paint the planks to match your interior design. The options are limitless!
Repaint the Current Trim
Before completely removing and replacing the slide out molding in your RV, consider if you can simply paint over the exisiting trim. If you like the style, but not the color or stain of your current trim, painting is probably the easiest option.
Considerations when Selecting New Slide Out Trim
When it comes to choosing new RV slide out trim, there are a few factors to consider. While you obviously want the new trim to look nice, it also needs to be practical.

Always Consider Weight
When adding anything to an RV, you must always consider weight. Ideally, the new trim added to your RV will not weigh any more than the manufacturer fascia that is removed. If the new trim is heavier, you should ensure the weight in your RV is under its overall carrying capacity.
Our new trim was slightly heavier than the original, but we had removed weight in other places when remodeling doors and furniture.
Prioritize the Width of Boards
Ideally, the new trim you purchase will be the same width as your original slide trim. It is must easier to trim boards for height or length. Finding trim or boards of the same width will make this DIY RV remodel project much easier.
Thanks for reading our complete guide to removing and replacing RV slide out trim. To see more of our DIY RV updates, check out our colorful RV kitchen renovation.
If you are planning a more extensive RV remodel, check out the following articles:
- Easy DIY RV Remodel Ideas
- What Does an RV Renovation Actually Cost?
- How to Paint RV Cabinets (The Easy Way)
Happy Camping!

Christina Pate is a seasoned full-time RVer who, along with her husband Justin, has journeyed across the US, Canada, and Mexico. Drawing from her extensive travels, RV repairs and RV renovations, she founded Travels with Ted to guide and inspire fellow RV enthusiasts. Christina is also the co-author of The Owner’s Guide to RV Maintenance and the creator of My RV Log Book.