
This post may contain affiliate links. See our affiliate disclaimer here.
Painting the cabinets in your camper is an easy way to brighten up the standard dark interior. Most RV remodelers recommend sanding the cabinets and applying multiple coats of primer, but there is an easier method. But I didn’t want to do all of that work!
In this article, I detail the process of painting RV cabinets with chalk paint, which does not require any sanding or priming. Keep reading to learn how to paint RV cabinets the easy way!
For more RV renovation tips, see our favorite easy RV remodel projects and our affordable RV bedroom makeover. Also check out a full description of our DIY RV kitchen remodel.
Chalk Paint for RV Cabinets
Chalk paint (also known as chalky paint or chalked paint) is a type of paint designed to be used on furniture made of wood or metal and other hard to paint surfaces. Since most RV cabinets are made from wood or wood-based materials, chalk paint is a great option.
Since chalk paint is thicker and has better adhesion than regular paint, sanding and priming are not required before painting. We used three coats of chalk paint on our RV cabinets and it went on easily and has held up great.
Where to Buy Chalk Paint
Chalk or chalky paint can be purchased at home improvement stores. We used Krylon Chalky Paint, which is available at Lowe’s Home Improvement and can be tinted in a variety of colors.
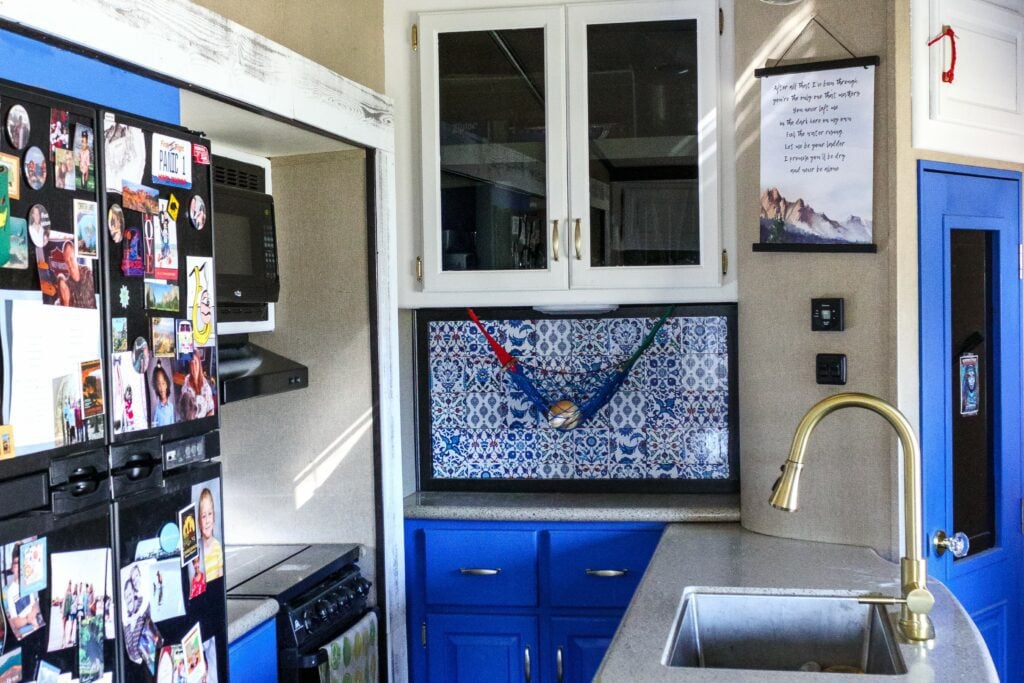
We used the white chalky paint on our upper cabinets, and tinted the paint blue for our upper cabinets. Our blue tint selection is called Deep Space. Click here to see the full list of Krylon’s Chalky Paint tint colors.
Downsides of Chalk Paint
While I think painting RV cabinets with chalk paint is the best method, there are some downsides to consider. The first con to chalk paint is the price. Chalk paint cost more than other typical interior paints.
However, these extra costs are most likely offset by the savings from not purchasing primer or sanding tools.
The second downside of chalk paint is the need to apply a topcoat (usually wax) after painting. The required topcoat creates some additional work, and needs to be re-applied every few years.
However, the wax also makes the paint extremely durable with a finish that is resistant to scuffs.
How to Paint RV Cabinets with Chalk Paint
Below is a step-by-step guide to painting RV cabinets with chalk paint. Follow these steps precisely for a beautiful final result.

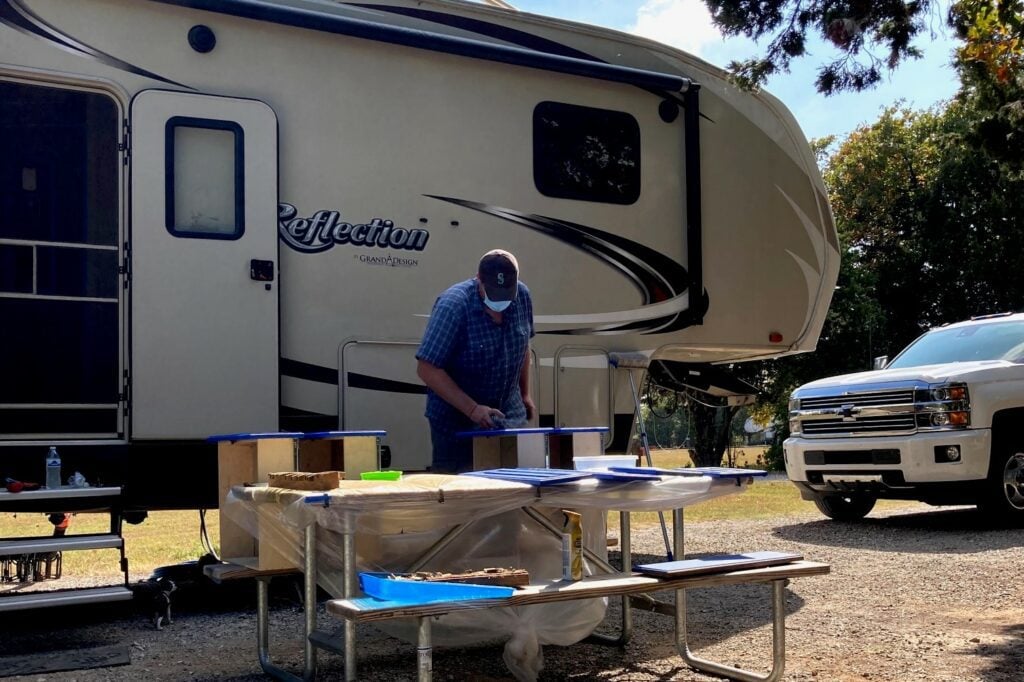
Step 1: Remove Cabinet Doors and Drawers
Remove the doors from all cabinets that will be painted. Also remove the hinges and hardware. As you are removing the doors, label each cabinet set (door, hinge and cabinet) with a corresponding number.
While some cabinets in your RV are the same size, they may not have been drilled in place the exact same way. Labeling cabinets and doors will prevent you from having to drill new holes. Also, pull all of the drawers out and label each drawer and its corresponding hole.
Step 2: Clean the Cabinets and Doors
Although sanding and priming are optional when painting RV cabinets with chalk paint, cleaning is not. Thoroughly clean all cabinets to ensure no stains or debris remain.
Step 3: Tape Cabinet Edges
Use painter’s tape to tape the edges of each cabinet and the interior edges of cabinet doors with glass.
Step 4: Paint the Cabinets
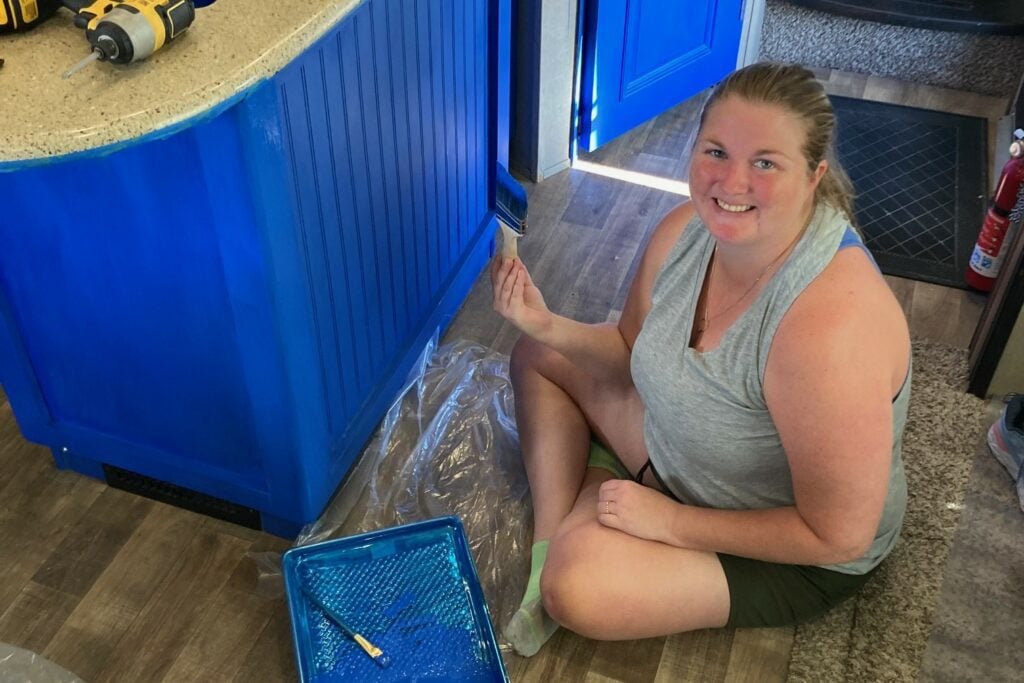
Apply the first coat of chalk paint using a brush or roller. Keep in mind that chalk paint is thick, so be careful not to put too much paint on the brush.
Wait for the paint to dry (about 20 to 30 minutes). Then, paint a second coat on the cabinets. Allow paint to dry and add additional coats if needed.
Step 5: Remove Tape
Once the paint is dry. Remove the painter’s tape.
Step 6: Apply Topcoat
There are two topcoat options for chalk painted cabinets. The first option is finishing wax. Wax enhances and deepens the paint color and gives the cabinets a nice matte sheen. Simply use a wax brush to apply a thin coat of wax on all painted surfaces.
The second top coat option is a polycrylic. Polycrylic topcoats can be purchased with matte or glossy finishes. It is an ideal top finishing coat for surfaces that will get wet.
Apply to cabinets with either a bristle or foam brush, roller or spray. We recommend applying a thin layer, letting it dry and applying a second layer for added protection.
Step 7: Rehang Doors
After allowing the paint to fully dry, re-install the hardware, put the drawers back in place and hang the cabinet doors back up. Then, sit back and enjoy your work.
How to Paint RV Cabinets with Regular Paint
If you do not wish to use chalk paint. Follow the below steps for painting your RV cabinets with standard cabinet paint, such as latex paint.

Step 1: Remove Cabinet Doors and Drawers
Remove the doors from all cabinets that will be painted. Also remove the hinges and hardware. As you are removing the doors, label each cabinet set (door, hinge and cabinet) with a corresponding number.
While some cabinets in your RV are the same size, they may not have been drilled in place the exact same way. Labeling cabinets and doors will prevent you from having to drill new holes. Also, pull all of the drawers out and label each drawer and its corresponding hole.
Step 2: Sand Cabinets
Sanding the cabinets ensures that the paint will properly adhere to your RV cabinets. Use a 180-grit sandpaper and sand all cabinet surfaces that will be painted. An electric palm sander will significantly speed up the the process.
Step 3: Clean the Cabinets
Once you are done sanding you need to clean all the dust off of your cabinets. Slightly dampen a clean, soft cloth and wipe down all of your cabinets and drawers. If cabinets need to be degreased, clean them with TSP. Allow cabinets to dry before proceeding.
Step 4: Tape Cabinet Edges
Use painter’s tape to tape the edges of each cabinet and the interior edges of cabinet doors with glass.
Step 5: Prime the Cabinets
When painting RV cabinets, select a bonding primer or gripper primer with strong adhesion power. Brush or roll a coat of primer on all of the cabinets. Allow the primer to dry as long as directed on the can. Apply a second coat of primer.
Step 6: Paint the Cabinets
Select a semi-gloss paint with a high sheen, which holds up best in high traffic areas like kitchens. Apply at least two coats of paint to your RV cabinets. Refer to the paint for instructions on how much time to allow between coats.
After two coats have fully dried, look over the cabinets and apply an additional coat if needed.
Step 7: Remove Tape
Once the paint is dry. Remove the painter’s tape.
Step 7: Rehang Doors
After allowing the paint to fully dry, re-install the hardware, put the drawers back in place and hang the cabinet doors back up. Then, sit back and enjoy your work.
Tips for Painting RV Cabinets
The following tips for painting RV cabinets will ensure an awesome finished result.
Tip 1: Test the Color
After cleaning and/or sanding the cabinets, paint a small patch of cabinet with your desired color. Painting a test patch on your RV cabinets will prevent you from moving forward with a color you do not really love.
Not sure what color to start with? Check out these 10 chic RV remodel color schemes.
Tip 2: Scratch Test
Also use the test patch to perform a quick scratch test. After the first coat of paint or primer has completely dried, run your fingernail down the surface using medium pressure. If you can scratch any paint off, you need to better prepare your surface or use a different paint or primer.
Tip 3: Don’t Forget the Backside
For a fully finished look when painting RV cabinets, paint the inside and outside of cabinet doors. Paint one side on all the cabinets first, then allow them to dry while you paint the cabinet bases. Once dry, flip the doors over and paint the other side.
Tip 4: Buy Multiple Brushes
With all the small nooks and corners in an RV, you will need a variety of brush sizes to reach every cabinet surface. Have some small detail brushes on hand as well as large brushes or rollers for bigger areas.
Tip 5: Pay Attention to Cure Time
While most paint dries to the touch within a few hours, it does not fully cure for several days. Before painting RV cabinets, check the paint’s cure time. Try to remain stationary and avoid slamming doors until the paint is fully cured.
If painting RV cabinets sounds like more work than it is worth, consider purchasing an RV with pre-painted cabinets. These 9 RVs come straight from the factory with white cabinets and other modern interior design features.
While you are painting your cabinets, also select RV cabinet latches to secure them on travel days.
Do plan to paint your RV cabinets and drawers? If so, do you plan to use chalk paint? Share your plans with us in the comments section below.
Christina Pate is a seasoned full-time RVer who, along with her husband Justin, has journeyed across the US, Canada, and Mexico. Drawing from her extensive travels, RV repairs and RV renovations, she founded Travels with Ted to guide and inspire fellow RV enthusiasts. Christina is also the co-author of The Owner’s Guide to RV Maintenance and the creator of My RV Log Book.
I’ve never remodeled my home before, so I really don’t know where to start. Luckily, I found the best paint for my RV cabinet. It’s a paint kit from Nuvo. This paint is highly recommended as it’s a safe, easy, and cheap solution when you just need to add some color to your interior.