This post may contain affiliate links. See our affiliate disclaimer here.
Many nomads are renovating their RVs, and turning them into beautiful tiny homes on wheels. However, there are a few areas of the RV that are often overlooked during the renovation process. The ceiling is one of these areas.
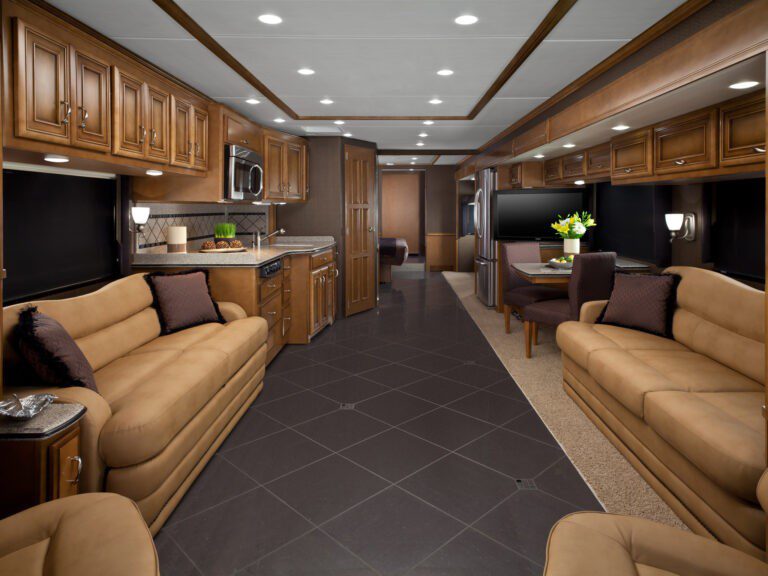
Most RV ceilings are a boring color, like beige, and many contain outdated light fixtures and accent pieces. Below are 15 RV ceiling ideas that will make the top of your remodel as beautiful as the rest of your tiny space.
RV renovations take a lot of time and money. If you are questioning whether or not you want to take on an RV remodel, consider buying an RV that already has a modern look. Here are 10 RVs that come with white cabinets and other modern finishes straight from the factory.
Contents
Paint your RV Ceiling
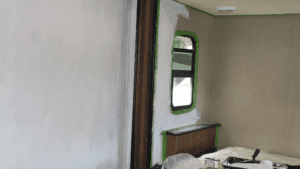
Painting all of the walls and cabinets white is a popular choice among RV renovators. If you are painting the walls of your RV white, you should also consider painting the ceiling as well.
Most ceilings in modern RVs are an off-white or beige color. If you paint the walls a bright white without touching the ceiling, it will look old and dirty in comparison.
As long as your RV has hard surface ceilings, the process of painting the ceiling is similar to painting the walls. The basic process is as follows:
- Clean: Thoroughly clean the ceiling to remove any dust or debris before painting.
- Tape: Tape off all areas not being painted, such as fixtures and vents.
- Prime: For the best results, always use a bonding or gripper primer when painting RVs. These primers will adhere better to nontraditional surfaces and ensure a professional looking finished product.
- Paint: Use rollers or a paint sprayer to paint the ceiling with the same paint used on your RV’s walls.
When painting an RV ceiling, also consider the color of your vents and other fixtures. If these items are already a bright white, you may be able to reinstall them without any updates.
However, if any of these items have yellowed or are beige, you may want to update them as well. Either order replacement parts in another color or spray paint them.
Create a Faux Tin Ceiling
There is nothing more classic than a tin ceiling. However, real stamped tin tiles can be prohibitively expensive. Fortunately there are plenty of faux tin tiles on the market that are affordable and easy to install.
Tiles that are installed with glue or another adhesive are ideal, so you do not have to use screws or nails in your RV ceiling.
PVC Faux Tin Tiles

PVC tiles give the look of a tin ceiling in a lightweight, affordable and easy to install material. These Grandma’s Doilies faux tin PVC tiles comes in a 25 pack of quartet tiles that cover 100 square feet of space for just a little bit more than $250 dollars.
The tiles can easily be cut with scissors to fit your RV ceiling. PVC tiles are installed by gluing them directly to the ceiling.
Peel and Stick Faux Tin Tiles

If you are looking for more affordable RV ceiling ideas, peel and stick tiles are a great option. Peel and stick tiles are great for a number of reasons. First, they can easily be removed without damaging your ceiling if you want to change up your look or sell your RV.
They are also more affordable, with a four pack of 10-inch by 10-inch InHome tiles priced at under $12. Peel and stick tiles work best on smooth surfaces, so they are not the best choice for a textured camper ceiling.
Install Wood Panels
To add warmth to your RV, a wood ceiling is the ideal choice. Wood ceilings are a common choice in school bus conversions, so there is no reason they cannot be installed in an RV.
However, installing a real wood ceiling does require more hard work and skills than some of our other RV ceiling ideas.
Wood Pallet Ceiling
Buying wood pallets is a relatively affordable way to collect wood planks for a ceiling remodel. A pallet to wood ceiling project is not for the faint of heart.
It requires a lot of planning and carpentery skills to ensure the final result is safe and beautiful. See Skoolie Livin’s guide to creating a wood pallet ceiling for step by step instructions.
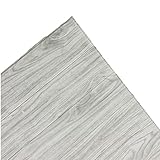
Tongue and Groove Planks
Tongue and groove wood planks are another impactful RV ceiling material. While the planks are purchased pre-cut, they still require a significant amount of work to install.
Cedar ceiling planks or painted white planks are both great options. Read Chatfield Court’s guide to installing wood planks in an RV for detailed instructions.
Styrofoam Ceiling Tiles
While Styrofoam is likely not your first thought for a camper ceiling material, it is a great choice because it is super lightweight.
Many companies make Styrofoam ceiling tiles that mimic heavier and more expensive materials. While foam tiles look great, they can be fragile so they are best for higher RV ceilings where campers’ heads do not touch.
Decorative Styrofoam Tiles
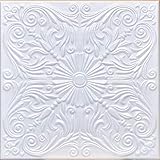
To mimic the look of plaster ceilings, purchase white, decorative Styrofoam tiles. These floral pattern tiles from the Antique Ceilings Store are a great option for any RV remodel. The tiles will easily glue to the exisiting RV ceiling and can be cut with razor knife for the perfect fit. If you want to add a special touch, the tiles can be painted as well.
Wood Foam Tiles
For a more streamlined look than the floral tiles, try foam tile shaped like wood planks. These white, wood style foam tiles are super easy to install, just remove the backing and stick the ceiling! These large PE foam tiles come in 27-inch by 27-inch boards, but they can be easily cut to size as needed.
Wallpaper the Ceiling
Wallpaper is an excellent choice for RV owners who love color. Use peel and stick wallpapers which are easier to install than traditional wallpapers. If you select a bold print, consider only wallpapering a section of the RV ceiling so the effect is not overwhelming.
A little wallpaper goes a long way in an RV. For more inspiration, check out these other fun RV wallpaper ideas.
Accent Ceiling

Wallpaper is the best material to create a small but impactful accent ceiling. Choose a bold print in a high-quality paper, like this Tempaper’s Novogratz Star Paper. Install the paper in a select section of your RV’s ceiling, such as the top of a slide or over the kitchen island. Tempaper wallpaper is also easily removeable if you want to change up your design.
Shiplap Wallpaper

Tempaper also makes a shiplap style wallpaper that is a better option to cover the entire camper ceiling. Since the wallpaper is removeable it is a feasible project for any DIYer. If you misalign the paper, simply remove the paper and try again. The ease of installation makes this wallpaper a great alternative to real wood ceilings.
Wallpaper Decals

If wallpapering the ceiling sounds like too much work, consider adding simple wallpaper decals instead. We particularly love these outer space themed decals for a bunkroom ceiling.
Install New Light Fixtures

If repainting or recovering an entire RV ceiling is too big of a project, changing out light fixtures is another way to upgrade ceilings and create a more modern look in a small space. The first thing to pay attention to when purchasing RV lighting is the voltage.
Most RV lighting fixtures are 12 volts, so they can run on the RV’s battery power. While it is possible to convert standard 120 volt lights to 12 volt lights, it is easier to just install 12 volt light fixtures.
Our favorite 12 volt RV light fixture is the RecPro Iron Sphere Ceiling Light. It’s sleek design and long pendant bulb elevate any RV interior design. If this fixture won’t work in your space, check out our full list of 17 volt dazzling light fixtures for RVs.
Add a Ceiling Fan
A ceiling fan is a more practical upgrade for your RV ceiling. Similarly to RV light fixtures, ceiling fans must be 12 volt fixtures to run on RV battery power. Fortunately, we have compiled a full list of all the RV friendly 12 volt ceiling fans available.
While ceiling fans are a great way to cool down in your camper, they are not appropriate for all RVs. Only install a ceiling fan in rigs where the ceiling height is significantly taller than the campers who will be walking around inside. Ceiling fans work best in fifth wheels and motorhomes that tend to have more interior height.
Add Medallions Around Lights
Whether you plan to replace your RV lights or keep the ones from the manufacturer, adding a medallion around the fixture adds texture and interest.
Traditional Medallion

For a classic look, install these simple and lightweight PVC medallions around your ceiling lights. Chose from a classic white medallion or several metallic finishes. The medallions are also available in multiple sizes to fit your light fixture.
Floral Medallion
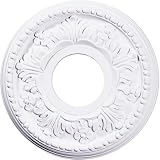
For a more ornate addition to your RV ceiling, install this ceiling medallion with floral details. The lightweight medallion can be screwed or glued into place for easy installation. This product can be purchased factory primed and ready to paint or hand-painted in a variety of colors.
Modern Medallion
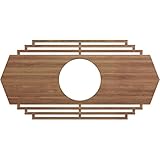
For a modern ceiling accent, install this Ekena Millwork wood ceiling medallion. The uniquely shaped medallion is available in a variety of wood finishes and sizes.
Considerations for Selecting a RV Ceiling Ideas
Water Damage
Water damage is a common reason for wanting to upgrade your RV ceiling as leaks often leave soft or yellowed spots. However, cosmetic upgrades should never be used to cover real problems.
Water damage can lead to structural issues with your recreational vehicle, and should always be examined and repaired by a professional. If a previous owner has made cosmetic updates to an RV ceiling, always have a professional inspector check for water damaging before completing a purchase.
Weight
As with everything in RVs, the weight of ceiling materials always needs to be considered. Towing or driving an over-weighted RV is dangerous. Using lightweight materials is always the best choice.
If your RV ceiling ideas utilize a heavy material, make sure your total RV weight is still below the recommended maximum for your vehicles.
Curves
Curves are one factor that can make implementing these RV ceiling ideas more difficult. Most RV ceilings are not completely flat and have a slope or curve. When covering a curved surface, make sure your materials are flexible enough to bend with the angle of the ceiling.
Durability
For nomadic RV owners, durability is another important consideration. Motorhomes and trailers bounce quite a bit traveling down the road, so anything attached to the ceiling needs to be secured well.
Use high quality adhesives to ensure any glued materials will stay in place while the RV is moving. Since RVs are often parked in sandy, dusty places also consider whether the ceiling materials are easy to clean.
Tiny Design
When designing tiny spaces, less is often more. Dark colors and multiple patterns can make a small space feel smaller. Use bright colors for ceiling renovations to prevent your RV from feeling closed in.
If you really want to use a dark color or have a bold ceiling statement piece, consider only creating an accent space instead of covering the entire ceiling.
Also consider ceiling height in your design. For travel trailers, camper vans or fifth wheel bedrooms with low ceilings, avoid adding bulking material that will further reduce the ceiling height.
Safety
Last but not least, always consider the safety of any RV renovation project, including your new ceiling.
In addition to being secured properly, any materials used on the ceiling should be properly treated so you are not creating fire hazards. Look for products that are class “A” fire rated and consult a professional if you are unsure of a material’s safety.
Pin it for Later
Remodeling an RV or camper is a rewarding experience. Just remember that every renovation takes twice as much time and money as you planned. Plan carefully and consult RV and interior design experts as needed.
For more RV renovation projects, tips and inspiration, check out the following articles:
- Easy and Affordable RV Master Bedroom Upgrades
- Modern Décor for the Modern RV Nomad
- 9 Swoon-Worthy RV Wallpaper Ideas
- The True Cost of RV Renovations
What RV renovation project are you most excited about? Share your favorite upgrade in the comments sections below.
Safe travels and good luck with your RV renovation!

Christina Pate is a seasoned full-time RVer who, along with her husband Justin, has journeyed across the US, Canada, and Mexico. Drawing from her extensive travels, RV repairs and RV renovations, she founded Travels with Ted to guide and inspire fellow RV enthusiasts. Christina is also the co-author of The Owner’s Guide to RV Maintenance and the creator of My RV Log Book.